4.1.4 Incident page
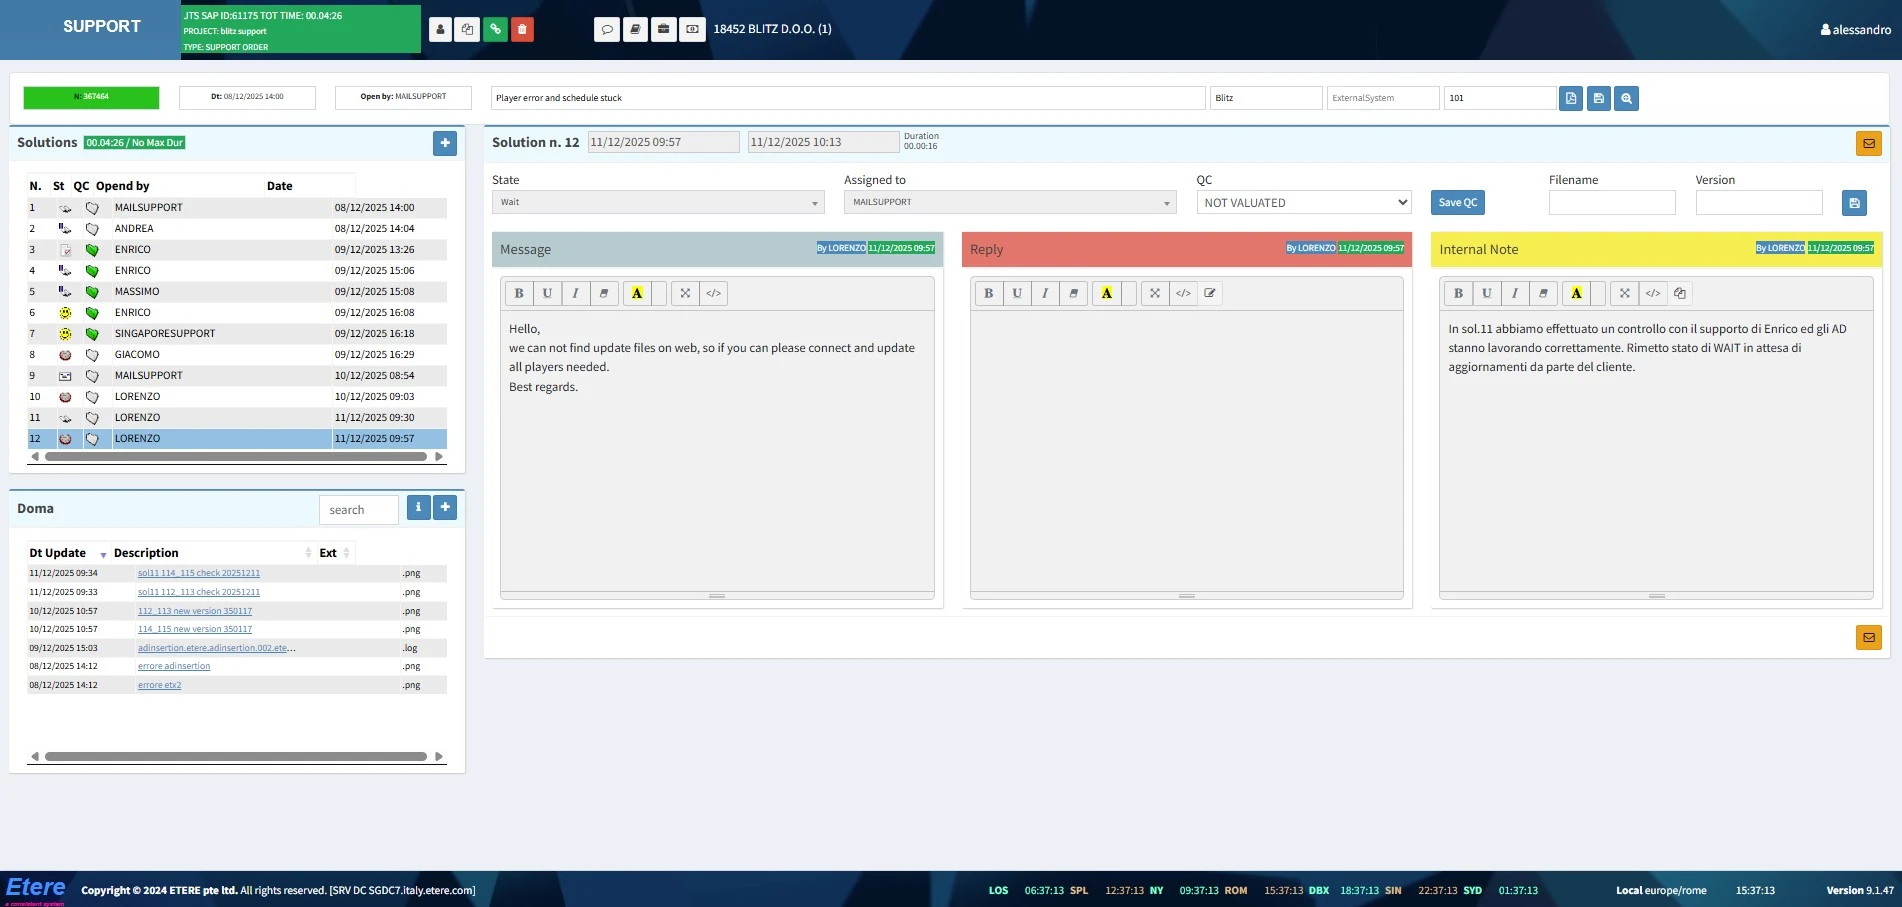
This is the page where an incident can be fully managed and it consists of the following areas, described below.
incident_page
HEADER
The header of the ticket contains these information and functions:
• SUPPORT button: Brings you back to the incidents list.
• Jts sap id, total time, project and type: These are information related to the customer's support contract and the sum of all the durations of every solution of the ticket, expressed in the format dd.hh:ss.
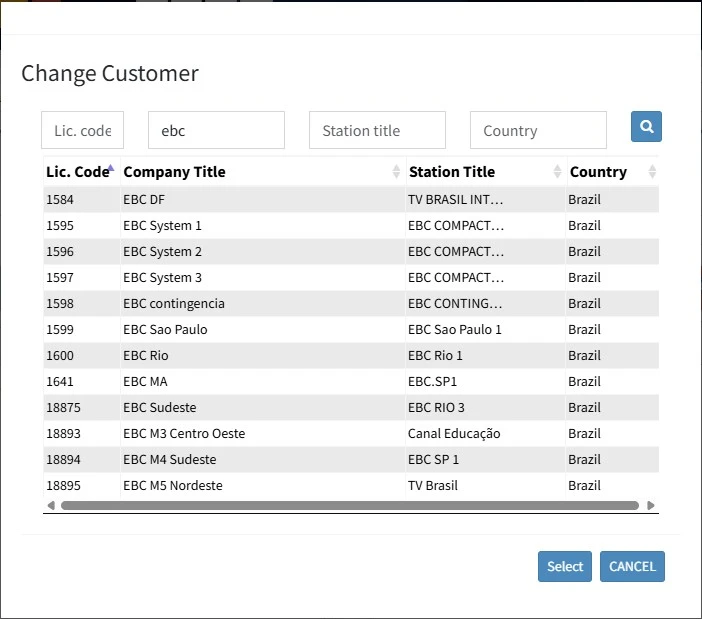
• Change customer: This button allows to change the customer for the current ticket. The form allows to search the new customer by license code (customer code), Customer (Company title), Station title and Country.
change_customer
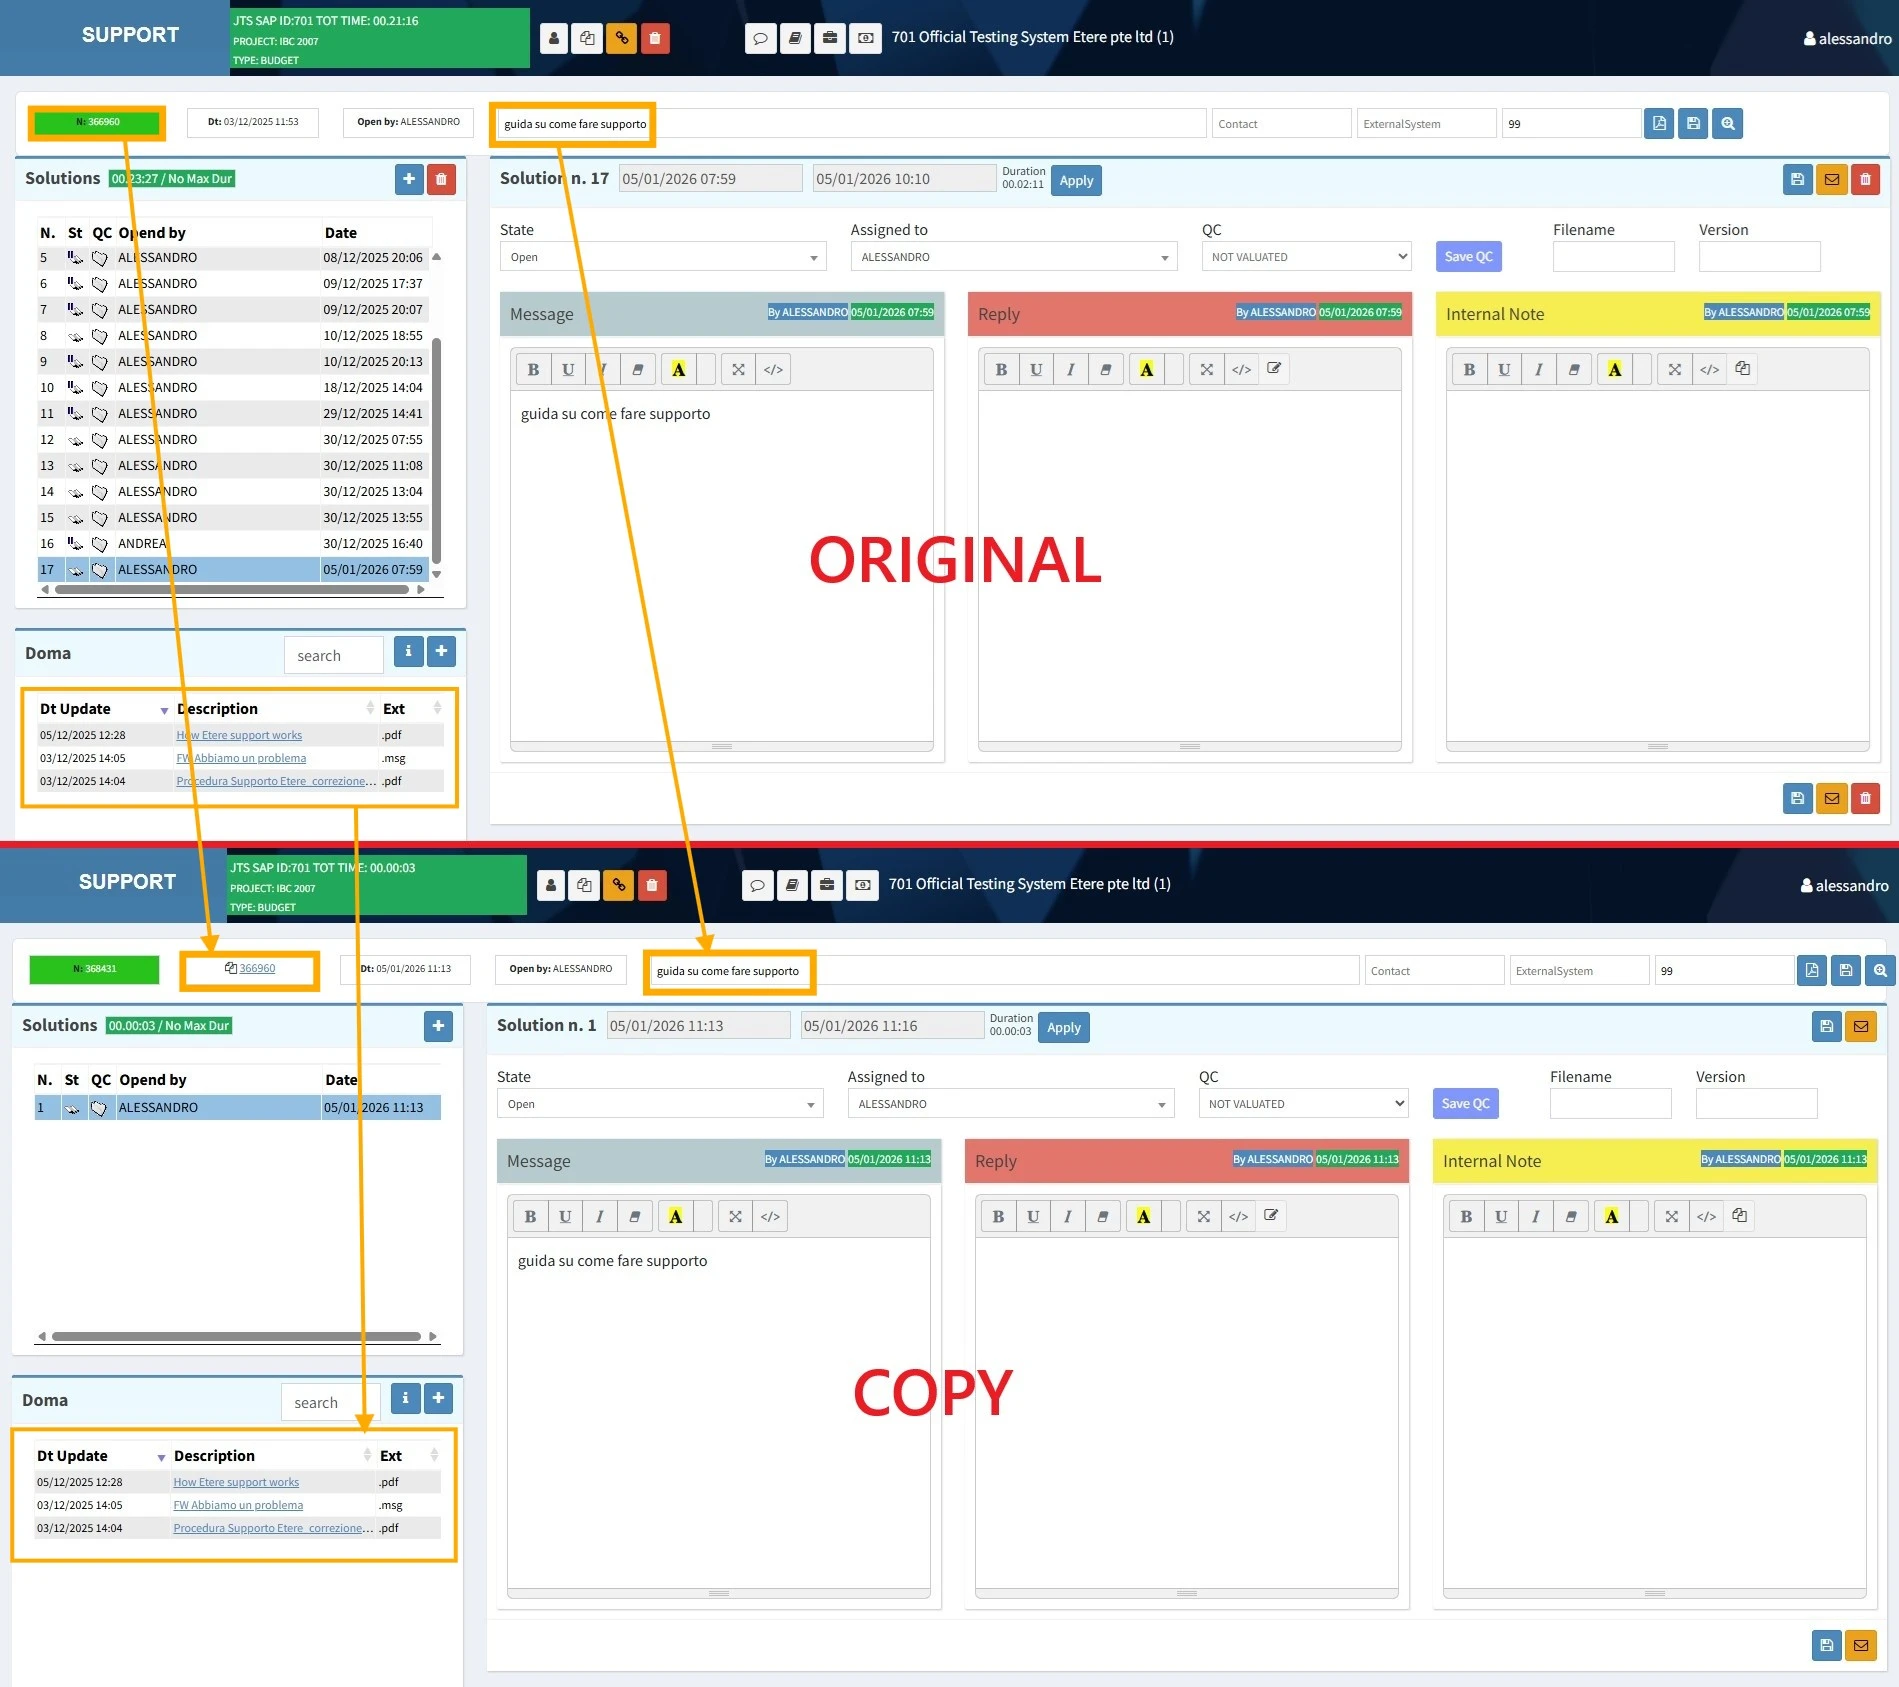
• Copy incident: It allows to create another ticket for the same customer, with the same subject and with the first solution as the source ticket's last one. The source ticket number is displayed beside the new one and if clicked, allows to quickly access it. In the following image you can see the differences between the original incident and its copy:
difference_original_copy
• Open linked incidents: Opens a form to create a link between the current ticket and another one.
• Delete: Deletes the current ticket. A deleted incident is kept anyway in the support database and can be only accessed through the advanced search, enabling the "Deleted call" filter. See chapter 3.1.2.0 Advanced search for detailed info.
• Open note: This form contains some additional information about the customer. It can't be edited by standard support users.
• Open contacts list: Displays a list of the contacts retrieved from the customer's personal data in support database. The email addresses in this list marked with a tick in "Supp." column are the ones enabled to receive emails sent from support website. Rachel Yang is in charge to modify this list and to enable or disable an address for support (Supp.) or invoicing (Inv.). When you receive such request from a customer, forward the email and the ticket to Rachel and send a standard reply to the customer.
• Open customer area: Opens the support customer area in a new tab of the browser. See chapter 3.1.5.1 Customer area for more information.
• Open license: Displays the customer license, that lists all the purchased modules with the related expiry date, quantity and licensed stations. A detailed description of the license form is available in the chapter 3.1.6.0 Customer license.
• Customer code and description
• User menu: Here you can find the same functions described in chapter 3.1.3.0 User functions.
INCIDENT INFO
Below the header, there is another section that contains the general info of the ticket. Starting from the left, the information displayed are:
• Incident number: The progressive and automatically assigned ticket number.
• Creation date and time
• Open by: The user who created the ticket. If it has been created by the mail cataloguer, this field will display MAILSUPPORT.
• Subject
• Contact: The person that usually replies to our emails or calls us by phone.
• ExternalSystem: In case the ticket is connected to another one in a different ticketing system, here is where you can type the other id, to have a reference.
• Priority: The priority value assigned by Fabio to the ticket, according to the urgency of the problem or the importance of the job. To a lower value corresponds a higher priority. Tickets with the higher priority values are highlighted in orange. This is the same priority developers follow for the modifications Fabio assigns them.
On the right side, the following functions are available:
• Report: It allows to print the ticket or the selected solution, including or excluding the internal note field.
• Save: It saves the incident.
• Search inside incident: It allows to search a keyword inside the Message, Reply and Internal note fields of every solution of the ticket. The found solutions will be highlighted in yellow.
SOLUTIONS LIST
This is the list of all the solutions created by every user that managed the ticket since its creation.
For each solution you can find:
• Its number
• The state set when it was saved
• The name of the user who edited the solution
• The date and time of its creation
Also, above the table, you can find displayed:
• The sum of the durations of every solution
• A maximum duration (if set by Fabio or by an admin user enabled to set it). The max duration means that support should finish the job and close the ticket within that time.
The buttons Add and Delete, allow to create a solution or delete the selected one.
SOLUTION
Every solution can be opened in the main panel of the page, which is made by the following elements:
• Jts start - end: These fields can't be edited. The start time is marked automatically at the creation of the solution; the end time is marked each time the Apply button is pressed, taking the time from the domain controller. The difference between the end time and the start time is automatically calculated and the duration is displayed beside the Apply button. This value is very important because mark the time spent on a solution. Programmers must also enter this value by clicking the "Apply" button upon completing a task, so that the time spent developing a module or function, or fixing a bug, can be tracked.
• State: The list of all the existing states in support. To set some of them, special permissions are required.
• Assigned to: The user or the group which the ticket has been forwarded to. Usually this is used in combination with the "Advanced analysis" state, but an incident can also be assigned with a different state. There are states that can't be assigned to everyone: for example a solution in "Request for modification" status can be assigned only to Fabio.
• QC: Formerly used to evaluate the solutions.
• Filename: This field is compiled by the developers when they release a fix. In this field you can find the name of the fixed file or, in the release solution (from SINGAPORESUPPORT), the name of the etere zip file released.
• Version: This field is compiled by the developers when they release a fix. In this field you can find the version of the fixed file or, in the release solution (from SINGAPORESUPPORT), the version of the etere zip file released.
• Message: This is the field where you see the emails sent by customers, once they are catalogued in the ticket.
• Reply: This is the field where support team writes the answers to customer emails and its content is what support website takes when the email is sent. Unlike Message and Internal note fields, here is also available the Templates button, where it's possible to select one of the standard replies according to the purpose, in english or italian (use Italian replies for Italian customers, English replies for all the others).
• Internal note: In this field support team writes all the observations, questions, hypotheses, logs analyses and relevant information for anyone who's going to manage the ticket later. It's strongly suggested to write complete information in a way everyone can understand them. In the Internal note field it's possible to copy the whole text using the button "Copy all content".
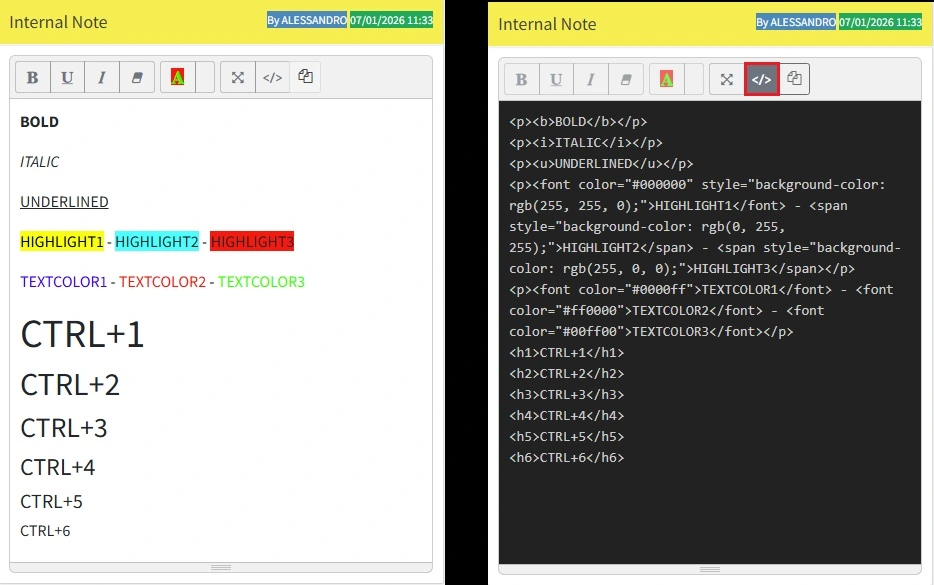
Note: In all these 3 fields it's possible to format the text with bold (CTRL+B), italic (CTRL+I) and underlined (CTRL+U) styles, as well as remove any font style (CTRL+\), highlight the text and change its color. It's also possible to see and edit the field content as HTML code and trigger the fullscreen visualization. With the shortcut CTRL+[numbers from 1 to 6] you can change the font size and remove any line spacing (on html side, you apply the header tags <h1>, <h2>...<h6>). With CTRL+0 you can restore the default font size and line spacing (on html side, you apply the paragraph tag <p>). See this image for reference: text_formatting
In the upper-right and bottom-right corners of this panel, 3 buttons allow to save the solution, save the solution and send the text in Reply by email, delete the solution.
DOMA (DOcument MAnagement)
This is the space where you can upload any file related to the ticket that can be useful for the analysis of the issue or as additional information.
Usually, etere support uploads here any relevant file received from the customer as attachment or any image in the email body.
Note: Some particular file extensions are not accepted.
The operations that can be performed on the uploaded files are:
• Preview: Open the file in a window overlapping the incident page. Not all the files can be previewed. The preview works for the most common text files (.txt, .log, .pdf, .xml), and image files (.jpg, .jpeg, .png) extensions.
• Edit: Allows to edit the description (filename) of the selected file and to define the content of the file uploaded in doma.
• Statistics: It displays some information about the overall amount of files uploaded in doma.
• Add: Open a new window to upload new files, by browsing a local or network folder, or by drag & drop. The chosen files can be uploaded/removed in bulk with the buttons Upload all/Clean all, or one by one. For each of them, you can edit the description and content, as well as see the upload progression.
• Delete: Remove the file from doma.
• Download: To download a file, click on its description. According to the browser settings, it will be placed in the default folder or you will be asked to select one.
• Search: In case of a big amount of files
FOOTER
The incident page footer just displays some useful information:
- Etere logo and copyright
- Domain controller server used for the time synchronization. The website uses the time provided by this server to display every time and date (creation of the solution, creation of the incident, jts...)
- Current time in different timezones: Los Angeles (LOS), Sao Paulo (SPL), New York (NY), Rome (ROM), Dubai (DBX), Singapore (SIN), Sydney (SYD)
- Local timezone and local time
- Support website version